Build
The Build tab is where the magic happens
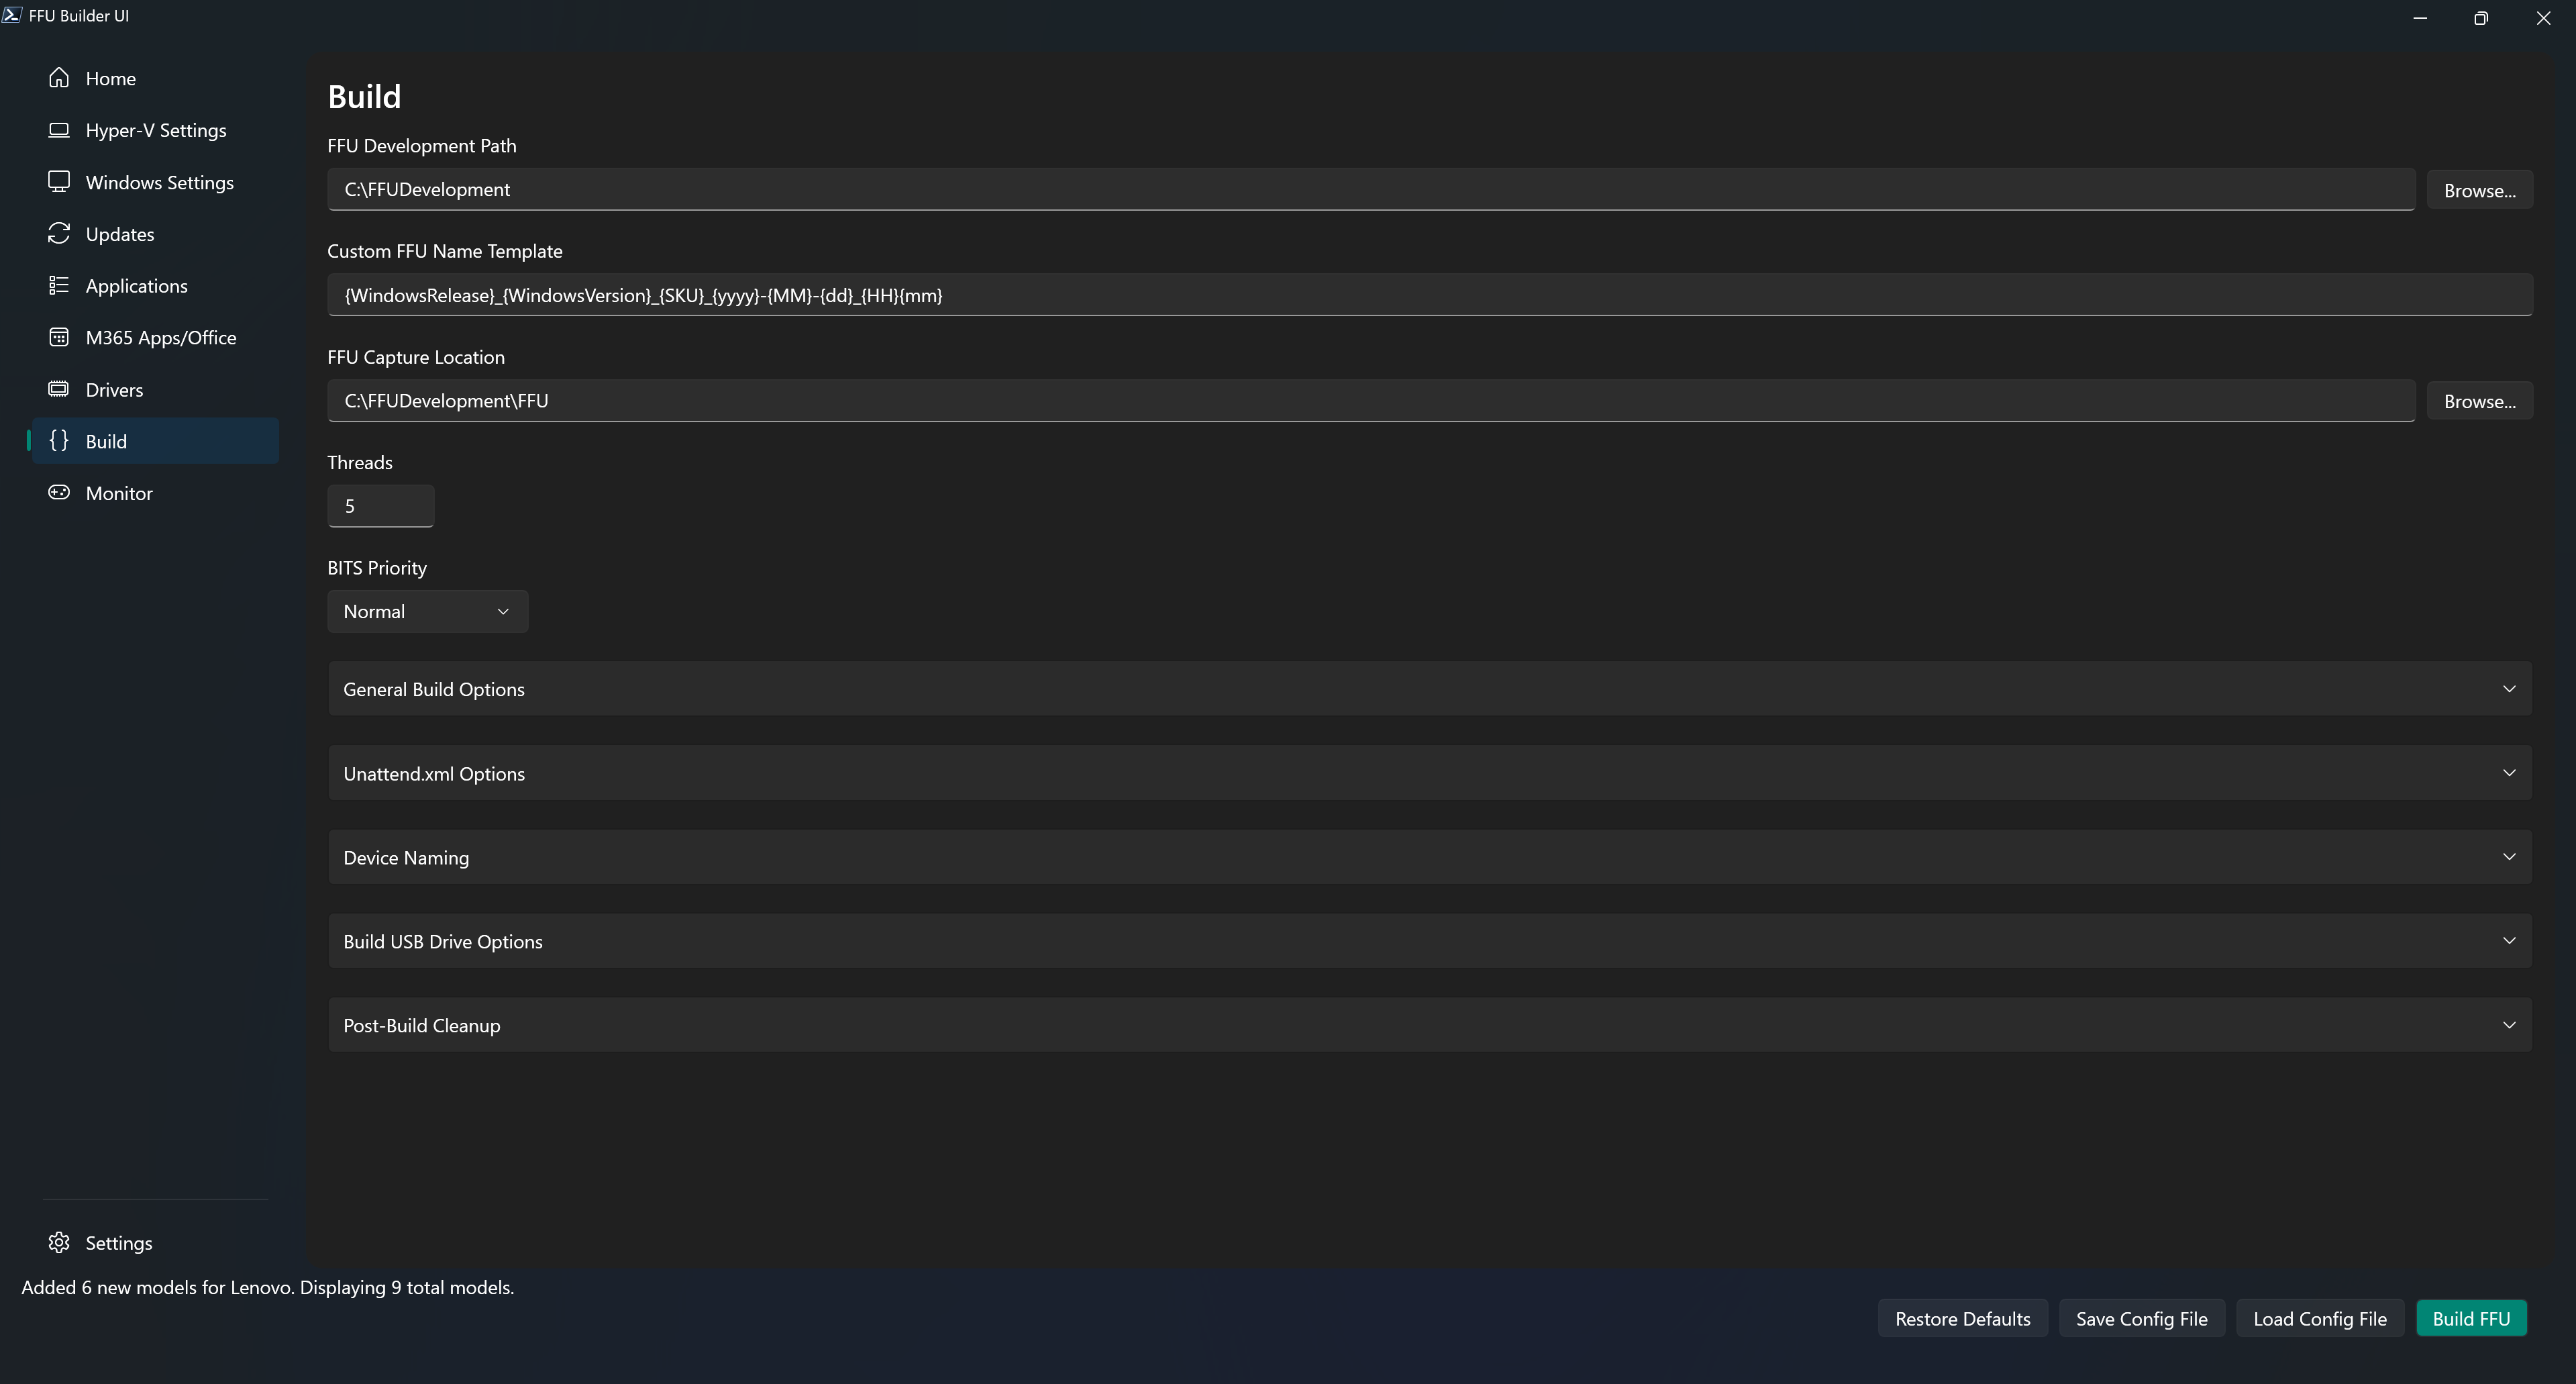
FFU Development Path
The FFU Development path ($FFUDevelopmentPath) is the root path of where most other paths are derived. The default is $PSScriptRoot, which is the location the script is currently running from and can be changed to another location from within the UI.
If you want to download and test new releases, or want to create a new FFUDevelopment folder without modifying your existing one, you can always download the source files and put them in another location.
The recommendation is to run from C:\FFUDevelopment and in most cases the path shouldn’t need to be changed.
Custom FFU Name Template
Controls the -CustomFFUNameTemplate parameter. This allows you to define a custom naming convention for the captured FFU file using placeholders that are replaced at build time.
If left blank, the default FFU naming convention is used.
Available Placeholders
| Placeholder | Description | Example |
|---|---|---|
{WindowsRelease} | Windows release number | 10, 11, 2016, 2019, 2022, 2025 |
{WindowsVersion} | Windows version | 1607, 1809, 21h2, 22h2, 23h2, 24h2 |
{SKU} | Windows edition | Home, Pro, Enterprise, Education, Standard, Datacenter |
{BuildDate} | Month and year | Nov2025 |
{yyyy} | 4-digit year | 2025 |
{MM} | 2-digit month | 11 (for November) |
{dd} | 2-digit day | 28 |
{HH} | Hour in 24-hour format | 14 (for 2 PM) |
{hh} | Hour in 12-hour format | 02 (for 2 PM) |
{mm} | 2-digit minute | 09 |
{tt} | AM/PM designator | AM or PM |
Examples
Basic template with date and time:
{WindowsRelease}_{WindowsVersion}_{SKU}_{yyyy}-{MM}-{dd}_{HH}{mm}
Result: Win11_24h2_Pro_2025-11-28_1425.ffu
Template with static text (e.g., indicating Office is installed):
{WindowsRelease}_{WindowsVersion}_{SKU}_Office_{yyyy}-{MM}-{dd}_{HH}{mm}
Result: Win11_24h2_Pro_Office_2025-11-28_1425.ffu
Simple template with build date:
{WindowsRelease}_{WindowsVersion}_{SKU}_{BuildDate}
Result: Win11_24h2_Pro_Nov2025.ffu
Note
The
.ffuextension is automatically appended if not included in the template.
FFU Capture Location
The FFU Capture Location sets the -FFUCaptureLocation parameter that determines where completed .ffu images are written. By default it points to $FFUDevelopmentPath\FFU, and the build script creates the folder automatically if it does not already exist.
When apps are installed in a VM, the build still uses the VM for application installs and sysprep, but the actual FFU capture now happens on the host after the VHDX is optimized and remounted. That means completed images are written directly to this folder without creating a temporary SMB share, temporary local account, or capture ISO.
Choose a path on fast storage with plenty of free space—the directory must be local to the host running BuildFFUVM.ps1, and large captures can easily exceed 25–30 GB. This location also feeds other options such as Copy Additional FFU Files, Build USB Drive, and Remove FFU, so keeping all finished images here keeps those workflows simple.
Threads
Controls the -Threads parameter, which sets the number of parallel threads used for concurrent operations throughout FFU Builder. The default value is 5.
Operations Affected by Threads
The Threads value applies to the following parallel operations:
| Operation | Description |
|---|---|
| Winget Application Downloads | When downloading multiple Winget applications, each application download runs as a parallel task |
| BYO Application Copy | When copying multiple Bring Your Own (BYO) applications to the Apps folder, each copy operation runs in parallel |
| Driver Downloads | When downloading drivers for multiple device models, each driver download and extraction runs as a parallel task |
Recommended Values
| Threads | Use Case |
|---|---|
| 1 | Minimal system impact; useful for troubleshooting or low-resource systems |
| 5 | Default; balanced performance for most systems |
| 8-10 | Higher concurrency for systems with fast storage and network connections |
Note
Setting a higher thread count may improve download times but will increase resource utilization. If you experience stability issues or resource constraints, try reducing the thread count.
Validation
The UI validates that the Threads value is a valid integer greater than or equal to 1. If an invalid value is entered, it automatically resets to 1.
BITS Priority
Controls the -BitsPriority parameter, which determines the priority level for Background Intelligent Transfer Service (BITS) downloads. The default value is Normal.
If you want faster downloads, change the priority to Foreground. Normal priority will significantly slow down downloads since BITS treats non-Foreground downloads as synchronous and queues each download. This means multiple driver or winget application downloads will go much slower than using Foreground. Normal is default as per Microsoft best practice guidance for using BITS.
General Build Options Expander
This expander groups the core build behaviors that affect how the FFU is created, optimized, cached, and prepared for deployment.
Compact OS
Controls the -CompactOS parameter. When checked, the Windows image is applied using compressed files. The default is checked.
How It Works
When enabled, the build script uses the -Compact switch with Expand-WindowsImage when applying the Windows image to the OS partition. This compresses Windows system files using Compact OS compression, which reduces the disk footprint of the operating system. On an x64 image, space savings is ~3.5-4GB.
Benefits
| Benefit | Description |
|---|---|
| Reduced Disk Space | Windows files are stored in a compressed state, saving several gigabytes of storage |
| Smaller FFU Size | The captured FFU file is smaller because the OS partition contains compressed files |
| Faster Deployment | Smaller FFU files transfer more quickly to USB drives and deploy faster to target devices |
| No Performance Impact | Modern CPUs decompress files faster than they can be read from storage, so performance is maintained |
When to Disable
You may want to disable Compact OS in the following scenarios:
- Windows Server builds: The script automatically disables Compact OS for Windows Server operating systems because the Windows Overlay Filter (wof.sys) is not included in Server SKUs
- Troubleshooting: If you experience issues with specific applications that are incompatible with compressed files
- Maximum performance requirements: In rare cases where every CPU cycle matters
Note
Compact OS is automatically disabled when building Windows Server images, regardless of this setting. The script detects Server operating systems and applies the Windows image without compression.
Update ADK
Controls the -UpdateADK parameter. When checked, the script checks for and installs or updates to the latest Windows ADK and WinPE add-on before starting the build. The default is checked.
How It Works
When enabled, the build process performs the following checks before starting:
- Version Check: Queries the Microsoft ADK installation page to determine the latest available ADK version
- Compare Versions: Compares the installed ADK and WinPE add-on versions (if present) against the latest available version
- Update if Needed: If an older version is detected:
- Uninstalls the existing Windows ADK
- Uninstalls the existing WinPE add-on
- Downloads and installs the latest Windows ADK with Deployment Tools feature
- Downloads and installs the latest WinPE add-on
Features Installed
When installing or updating the ADK, the following features are included:
| Component | Feature ID | Description |
|---|---|---|
| Windows Deployment Tools | OptionId.DeploymentTools | Includes DISM, Oscdimg, and other deployment-related tools |
| WinPE Environment | OptionId.WindowsPreinstallationEnvironment | Windows Preinstallation Environment used for capture and deploy |
Installation Location
The ADK is installed to the default location: C:\Program Files (x86)\Windows Kits\10
When to Disable
You may want to disable Update ADK in the following scenarios:
- Offline or air-gapped environments: When internet access is not available to download the latest ADK
- Controlled ADK versions: When you need to maintain a specific ADK version for compatibility or compliance reasons
- Faster builds: When you have already verified you are running the latest ADK version and want to skip the version check
Warning
If Update ADK is disabled and the Windows ADK or WinPE add-on is not installed, the build will fail. Ensure you have manually installed the required components before disabling this option.
Manual ADK Installation
If you prefer to manually install the ADK, visit:
Download and install the Windows ADK
You must install both:
- Windows Assessment and Deployment Kit (with Deployment Tools feature)
- Windows PE add-on for the Windows ADK
Optimize
Controls the -Optimize parameter. When enabled, FFU Builder runs the Windows ADK version of DISM to optimize the captured .ffu file:
DISM /Optimize-FFU /ImageFile:<path-to-ffu>
This post-processing step typically takes a few minutes and is intended to make FFU images faster to deploy and easier to deploy to differently-sized disks (by allowing the Windows partition to expand or shrink during apply).
Default: Enabled (-Optimize $true)
When to Disable
You may want to disable Optimize (-Optimize $false) if you are troubleshooting, or if you want to skip the extra post-processing time.
Warning
If you plan to deploy the same FFU to devices with different storage sizes (especially smaller disks), keep
-Optimizeenabled. Non-optimized FFUs are more likely to require additional partition management during deployment.
Note
FFU Builder also performs a separate “optimize VHDX before capture” step. That VHDX optimization is independent of
-Optimize, so you may still see “Optimizing VHDX before capture…” even when-Optimizeis disabled.
Allow VHDX Caching
Controls the -AllowVHDXCaching parameter. When enabled, FFU Builder caches the base VHDX it creates in $FFUDevelopmentPath\VHDXCache and writes a matching *_config.json file alongside it. On later builds, if a cached VHDX exists that matches your selected Windows settings and update set, the script reuses it to avoid re-applying the base image and integrating updates again.
Default: Disabled (-AllowVHDXCaching $false)
Cache Matching
A cached VHDX is reused only when the cache metadata matches your current build inputs, including:
- Windows release, version, and SKU
- Logical sector size (512 vs 4096)
- Optional features selection
- The exact set of update payload file names downloaded for that run (SSU/CU/.NET/etc.)
Disk Usage and Cleanup
VHDX caching trades disk space for speed. The VHDXCache folder can grow over time as you build different combinations. Periodically check the folder and remove old cached vhdx and config json files as necessary.
Note
To force a full rebuild, delete the contents of
$FFUDevelopmentPath\VHDXCache(or disable Allow VHDX Caching) and run the build again.
Create Deployment Media
Controls the -CreateDeploymentMedia parameter.
When enabled, FFU Builder creates WinPE deployment media that is used to deploy an FFU image to a physical device. This media contains the WinPE environment and deployment scripts needed to boot a target machine and apply the FFU image.
The deployment media is saved as an ISO file at $FFUDevelopmentPath\WinPE_FFU_Deploy_x64.iso (or WinPE_FFU_Deploy_arm64.iso for ARM64 builds). This ISO can then be used with the Build USB Drive option to create bootable USB media for physical deployments.
Default: Enabled (-CreateDeploymentMedia $true)
Note
If you only need to capture FFUs from VMs and do not plan to deploy to physical devices, you can disable this option to save time during the build process. However, most scenarios require deployment media for the final step of applying the FFU to target hardware.
Tip
If you just need to re-create deployment media, you can use the
Create-PEMedia.ps1script to regenerate the deploy ISO without running a full build.
Verbose
Controls the -Verbose common parameter. When checked, enables detailed verbose output during the build process. The default is unchecked.
In prior builds it was necessary to enable -verbose output to track in real-time the build process if you didn’t have cmtrace.exe or some other log-monitoring tool. With the UI, you can now watch the build in real-time using the monitor tab. Enabling verbose shouldn’t be necessary but is available for those who wish to use it.
Unattend.xml Options Expander
Use the Unattend.xml Options expander to choose how unattend content is staged and which source XML file FFU Builder should use for x64 and arm64 builds.
x64 Unattend File Path
Use x64 Unattend File Path to browse to the source XML file for x64 builds. The default path is .\FFUDevelopment\unattend\unattend_x64.xml.
arm64 Unattend File Path
Use arm64 Unattend File Path to browse to the source XML file for arm64 builds. The default path is .\FFUDevelopment\unattend\unattend_arm64.xml.
Inject Unattend.xml
Controls the -InjectUnattend parameter. When checked, stages the XML file selected for the current architecture in Unattend.xml Options into the Apps ISO so it’s baked into the FFU during the VM build process. The default is unchecked.
This option is used only when Install Apps is checked.
Copy Unattend.xml and Inject Unattend.xml are mutually exclusive. Select only one.
How It Works
When enabled, the build process:
- Uses the x64 or arm64 source file selected in Unattend.xml Options for the current build architecture
- Creates an
Unattendfolder inside.\FFUDevelopment\Appsif it doesn’t exist - Copies that file to
.\FFUDevelopment\Apps\Unattend\Unattend.xml - Includes the unattend file in the Apps ISO, making it available to sysprep during the VM build
The unattend file is then used by sysprep during the specialize phase and/or other OOBE phases when the FFU is deployed.
Creating Your Unattend Files
You can keep the default architecture-specific files in the .\FFUDevelopment\unattend folder or browse to another XML file in the UI:
| File | Description |
|---|---|
| unattend_x64.xml | Unattend file used for x64 builds |
| unattend_arm64.xml | Unattend file used for arm64 builds |
Important
The default paths use the architecture suffix file names shown above. FFU Builder still renames the selected file to
Unattend.xmlwhen it stages it into the Apps folder.
When to Use This Option
This option is primarily intended for scenarios where:
- You are not using the USB drive to deploy the FFU and use other deployment methods (e.g., network deployment, disk cloning, etc)
- You want the unattend configuration baked directly into the FFU rather than applied at deployment time
Limitations
| Limitation | Description |
|---|---|
| No prefixes.txt, SerialComputerNames.csv, or %serial% support | UnlikeCopy Unattend.xml, this method does not support prefixes.txt, SerialComputerNames.csv, or the %serial% variable for deployment-time device naming |
| Fixed configuration | The unattend settings are baked into the FFU at build time and cannot be changed at deployment time |
| Requires VM to be built | This option only works whenInstall Apps is $true because the unattend file is included in the Apps ISO |
Note
Most users should continue using the Copy Unattend option via the USB drive, which provides more flexibility including support for
prefixes.txt,SerialComputerNames.csv, and%serial%device naming. Use Inject Unattend.xml only when you won’t be using the USB drive for deployment.
Tip
If you’re using this option, you can disable Build Deploy ISO to save time during the build process since the deployment ISO is not needed when you’re not using the USB drive method.
Copy Unattend.xml
Controls the -CopyUnattend parameter. When checked, stages the XML file selected for the current architecture in Unattend.xml Options to an Unattend folder on the Deployment partition of the USB drive. The default is unchecked.
Use this option when you plan to build deployment USB media.
When enabled, the build process copies:
- The selected x64 or arm64 unattend XML file -> renamed to Unattend.xml on the USB drive
- prefixes.txt -> created from the Device Naming prefixes list when that mode is selected
- SerialComputerNames.csv -> created from the Device Naming serial mapping list when that mode is selected
If you keep the default file paths in place, FFU Builder uses unattend_x64.xml for x64 builds and unattend_arm64.xml for arm64 builds.
During deployment, ApplyFFU.ps1 applies Unattend.xml whenever it is present. Device naming only happens when the Device Naming setting requires it, or when older media still uses the legacy prompt-based workflow.
See Device Naming Expander below for the available computer-name modes and naming-file behavior.
Device Naming Expander
Use the Device Naming expander to decide whether ComputerName should be set at deployment time when unattend is applied. There are some major benefits to doing this:
- Total deployment time is reduced if naming is set at FFU deployment time since there is no additional reboot done during OOBE.
- Reduces the need for multiple provisioning packages or autopilot profiles. This means you can use a single PPKG or autopilot profile.
No Device Name
This is the default radio selection in the UI.
- If you leave device naming untouched, FFU Builder does not write
DeviceNamingModeto the generated config. This preserves the script’sLegacydefault, so an existingFFUDevelopment\Unattend\prefixes.txtfile is still copied to deployment media when present. - If you explicitly select this option, FFU Builder sets
DeviceNamingMode = None. The unattend file is still applied, but Windows generates a random computer name instead of forcing a prompt or a fixed name.
The active unattend_*.xml files in FFUDevelopment\Unattend use <ComputerName>*</ComputerName> in the current sample files.
Prompt for Device Name
Use this option when you want the technician to enter the computer name during deployment.
- FFU Builder sets
DeviceNamingMode = Prompt. - This option requires Copy Unattend.xml.
- The source
unattend_*.xmlfiles can stay at<ComputerName>*</ComputerName>. - During the build, FFU Builder rewrites only the staged deployment copy of
Unattend.xmlto the legacy prompt placeholder thatApplyFFU.ps1already recognizes. - Inject Unattend.xml is not supported with this option.
Specify Device Name
Use this option when you want a static device name or a template such as Comp-%serial%.
- FFU Builder sets
DeviceNamingMode = Template. - With Copy Unattend.xml,
%serial%is resolved during deployment in PE. - With Inject Unattend.xml, only static names are supported.
- Copy Unattend.xml and Inject Unattend.xml are mutually exclusive. Select only one.
Specify a list of Prefixes
This option writes prefixes.txt from the list in the UI. Enter one prefix per line in the multiline prefixes box. If there is a single prefix, deployment uses it automatically. If there are multiple prefixes, the technician is prompted to select one. The selected prefix is combined with the device serial number to create the computer name.
- FFU Builder sets
DeviceNamingMode = Prefixes.
For example, with a prefix of CORP- and a serial number of ABC123, the resulting computer name would be CORP-ABC123 (truncated to 15 characters if necessary).
Sample prefixes.txt content:
CORP-
STORE-
KIOSK-
Note
If the technician skips prefix selection when multiple prefixes are available,
ApplyFFU.ps1leaves the existing unattendComputerNamevalue unchanged. With the current unattend samples set to<ComputerName>*</ComputerName>, Windows falls back to its default random computer-name behavior, typically resulting in a name such asWIN-*.
Prefixes File Path
Use Prefixes File Path to point the UI at the source text file for the prefixes list. The file can use any name. When you browse to a prefixes file in the UI, or when a saved configuration references a valid prefixes path, the UI loads that file and populates the multiline prefixes box from its contents.
Save Prefixes
Use Save Prefixes to write the current multiline prefixes list back to the file specified in Prefixes File Path.
Specify Serial to Device Name Mapping
This option writes SerialComputerNames.csv from the CSV content in the UI. Use SerialNumber,ComputerName as the header row, then add one row per device. During deployment, ApplyFFU.ps1 compares the current BIOS serial number to the SerialNumber column and uses the matching ComputerName value.
- FFU Builder sets
DeviceNamingMode = SerialComputerNames.
Sample SerialComputerNames.csv content:
SerialNumber,ComputerName
ABC12345,CORP-001
DEF67890,KIOSK-010
XYZ24680,STORE-015
- This option requires Copy Unattend.xml.
- Inject Unattend.xml is not supported with this option.
- If no matching serial number is found during deployment,
ApplyFFU.ps1falls back to a randomFFU-*computer name so setup can finish.
Note
If
prefixes.txtandSerialComputerNames.csvare both staged manually on the same deployment media,ApplyFFU.ps1checksprefixes.txtfirst. FFU Builder avoids this conflict by only staging the naming file for the selected device-naming mode.
Serial Computer Names CSV Mapping File Path
Use Serial Computer Names CSV Mapping File Path to point the UI at the source CSV file for the serial-to-device-name mapping. The file can use any name. When you browse to a mapping file in the UI, or when a saved configuration references a valid CSV path, the UI loads that file and populates the multiline CSV box from its contents.
Save Serial Mapping
Use Save Serial Mapping to write the current CSV content back to the file specified in Serial Computer Names CSV Mapping File Path.
Deployment Prompt Compatibility
Older deployment media that already has an unattend file with ComputerName set to the legacy placeholder value and no prefixes.txt file will still prompt for a device name during deployment.
Warning
If using a provisioning package or autopilot json file, DO NOT specify a name in either of these. They will overwrite the name you have specified in the unattend.xml.
Creating Your Unattend Files
The .\FFUDevelopment\Unattend folder includes sample files you can customize:
| File | Description |
|---|---|
| SampleUnattend_x64.xml | Example unattend file for x64 systems |
| unattend_x64.xml | Active unattend file used for x64 builds |
| unattend_arm64.xml | Active unattend file used for arm64 builds |
| SamplePrefixes.txt | Example prefixes file for device naming |
| SampleSerialComputerNames.csv | Example serial-to-device-name CSV file |
Copy and customize the sample files to create your own unattend_x64.xml, unattend_arm64.xml, prefixes.txt, and SerialComputerNames.csv files.
Note
The unattend file must contain a
<ComputerName>element in theMicrosoft-Windows-Shell-Setupcomponent for device naming to work. See the sample files for the correct structure.
Build USB Drive Options Expander
This expander groups the settings used to create deployment USB drives after the FFU and deployment media are ready.
Build USB Drive
Controls the -BuildUSBDrive parameter. When checked, FFU Builder partitions and formats selected USB drives and copies the captured FFU plus the enabled deployment assets to them. The default is unchecked.
The remaining settings in this expander apply only when Build USB Drive is enabled.
Allow External Hard Disk Media
Controls the -AllowExternalHardDiskMedia parameter. When checked, allows the use of drives identified as “External hard disk media” via the WMI class Win32_DiskDrive. The default is unchecked.
Most USB thumb drives are identified by Windows as “Removable Media” and work with the default settings. However, faster USB drives—such as portable SSDs or high-speed USB 3.x drives—may be identified as “External hard disk media” instead. If you want to use these faster drives for imaging, enable this option.
Warning
Enabling this option may expose external hard drives attached to your machine to the USB imaging process. To prevent accidental data loss, use the Prompt for External Hard Disk Media option (enabled by default when this option is checked) to confirm which drive to use before formatting.
Prompt for External Hard Disk Media
Controls the -PromptExternalHardDiskMedia parameter. When checked, prompts for user confirmation before using any drive identified as “External hard disk media”. The default is checked when Allow External Hard Disk Media is enabled.
This option is only available when Allow External Hard Disk Media is checked.
When enabled, the build process will:
- Display a table listing all detected external hard disk media drives, including drive name, serial number, partition style, and status.
- Prompt you to select which drive to use for imaging.
- Only create a USB drive on the selected drive.
When disabled, the script will not prompt and can use multiple external hard disk drives simultaneously, similar to how removable USB drives function. This is useful for automated or batch imaging scenarios but increases the risk of accidental data loss.
Note
If you do not want to be prompted each time, you can disable this option after verifying that only your intended imaging drives are connected.
Select Specific USB Drives
When checked, enables manual selection of specific USB drives for imaging. The default is unchecked.
This option is only available when Build USB Drive is checked.
When enabled, a Check USB drives button and a list view appear. Click Check USB drives to scan for connected USB drives. The list displays all detected drives with the following information:
| Column | Description |
|---|---|
| Select | Checkbox to include or exclude the drive from imaging |
| Model | The model name of the USB drive |
| Unique ID | A unique identifier for the drive |
| Size (GB) | The total capacity of the drive in gigabytes |
Select one or more drives by checking the checkbox in the Select column. Only selected drives will be formatted and used for imaging when the build completes.
Use the Select All checkbox in the column header to quickly select or deselect all drives.
Note
If Select Specific USB Drives is unchecked, the build process will automatically use all discovered USB drives.
Copy Autopilot Profile
Controls the -CopyAutopilot parameter. When checked, copies the contents of .\FFUDevelopment\Autopilot to the Autopilot folder on the Deployment partition of the USB drive. The default is unchecked.
This option is only available when Build USB Drive is checked.
This leverages the Autopilot for existing devices json file. It’s not recommended to use this method any longer as devices enrolled via this method are enrolled as personal instead of corporate.
Copy Provisioning Package
Controls the -CopyPPKG parameter. When checked, copies the contents of .\FFUDevelopment\PPKG to the PPKG folder on the Deployment partition of the USB drive. The default is unchecked.
This option is only available when Build USB Drive is checked.
How It Works
- During Build: The build process copies all
.ppkgfiles from.\FFUDevelopment\PPKGto the USB drive. - During Deployment: When
ApplyFFU.ps1runs, it detects thePPKGfolder and the provisioning packages within it.- If multiple
.ppkgfiles are found, the technician is prompted to select which package to apply. - If one
.ppkgfile is found, it is automatically selected.
- If multiple
- Application: The selected provisioning package is copied to the root of the USB drive, where Windows picks it up during OOBE and applies the settings.
Copy Additional FFU Files
Controls the -CopyAdditionalFFUFiles parameter. When checked, allows you to select existing FFU files from the FFU Capture Location to copy to the USB drive alongside the newly built FFU. The default is unchecked.
This option is only available when Build USB Drive is checked.
How It Works
When enabled, an Additional FFU Files panel appears below the checkbox with the following controls:
| Control | Description |
|---|---|
| Refresh | Scans the FFU Capture Location folder for existing .ffu files and populates the list |
| FFU Name | The filename of the FFU file |
| Last Modified | The date and time the FFU file was last modified, useful for identifying the most recent builds |
The list displays all .ffu files found in the FFU Capture Location (default .\FFUDevelopment\FFU). Click on individual rows to select which FFU files you want to include on the USB drive. Selected files are highlighted in the list.
Use Cases
- Multiple device configurations: Copy different FFU files for different windows/application configurations (e.g., different versions of windows, different application stacks) to a single USB drive, allowing technicians to choose during deployment.
- Previous builds: Include a known-good FFU from a previous build alongside the new build as a fallback option.
- Multi-architecture imaging: Include both x64 and arm64 FFU files on the same USB drive for mixed-architecture environments.
Command Line Usage
When running BuildFFUVM.ps1 from the command line with -CopyAdditionalFFUFiles $true and no -AdditionalFFUFiles parameter specified, the script displays an interactive prompt listing all available FFU files in the capture folder. You can:
- Enter numbers separated by commas (e.g.,
1,3,5) to select specific files - Enter
Ato select all available files - Press Enter to skip and not include any additional files
Example command line usage with pre-selected files:
.\BuildFFUVM.ps1 -configFile .\config\FFUConfig.json -CopyAdditionalFFUFiles $true -AdditionalFFUFiles @("C:\FFUDevelopment\FFU\Win11_24h2_Pro_Nov2025.ffu", "C:\FFUDevelopment\FFU\Win11_24h2_Enterprise_Nov2025.ffu")
Note
The newly captured FFU from the current build is always copied to the USB drive. Additional FFU files selected here are copied in addition to the new FFU.
Max USB Drives
Controls the -MaxUSBDrives parameter, which sets the maximum number of USB drives to build in parallel. The default value is 5.
This option is only available when Build USB Drive is checked.
When building USB drives, the script processes multiple drives concurrently to speed up imaging. This setting controls how many drives are formatted and copied to simultaneously.
Post-Build Cleanup Expander
This expander groups the cleanup settings that run after a successful build completes.
Cleanup Apps ISO
Controls the -CleanupAppsISO parameter. When checked, the Apps ISO file is automatically deleted after the FFU has been successfully captured. The default is checked.
During the build process, when apps are being installed, the script creates an Apps.iso file in the FFU Development Path (for example, .\FFUDevelopment\Apps.iso). This ISO contains the contents of the .\FFUDevelopment\Apps folder, including application installers, Office deployment files, and orchestration scripts, and is mounted to the VM during the build to install applications.
When to Disable
You may want to disable Cleanup Apps ISO in the following scenarios:
- Debugging app installations: When troubleshooting application installation issues and you want to manually inspect the ISO contents
- Multiple builds with same apps: If you’re running consecutive builds with identical app configurations and want to reuse the existing ISO to save time (the script will recreate it if missing)
- Archival purposes: When you need to retain a copy of the exact Apps ISO used for a specific FFU build
Note
The Apps ISO is only created when applications are configured for installation. If no apps are being installed in the FFU, this option has no effect. Keeping this option enabled helps conserve disk space by removing temporary build artifacts.
Cleanup Deploy ISO
Controls the -CleanupDeployISO parameter. When checked, the WinPE deployment ISO file is automatically deleted after the FFU has been successfully captured. The default is checked.
During the build process, when Build Deploy ISO is enabled, the script creates a WinPE_FFU_Deploy.iso file (for example, .\FFUDevelopment\WinPE_FFU_Deploy.iso). This ISO contains a customized Windows PE environment used to deploy captured FFU images to target devices. The deployment ISO is typically copied to a bootable USB drive along with the FFU files for field deployment.
When to Disable
You may want to disable Cleanup Deploy ISO in the following scenarios:
- Creating deployment media separately: When you want to create USB deployment drives at a later time, see USB Imaging Tool Creator for a staged workflow using
USBImagingToolCreator.ps1with a deploy ISO,FFU, andDriversfolder (local path or network share) - Testing in Hyper-V: When deploying FFU images to Hyper-V VMs for testing, you can attach the deploy ISO directly to a VM as a DVD drive
Cleanup Drivers
Controls the -CleanupDrivers parameter. When checked, the contents of the Drivers folder are automatically deleted after the FFU has been successfully captured. The default is unchecked.
During the build process, when drivers are configured for installation, the script downloads and extracts driver packages into manufacturer-specific subfolders within the Drivers folder (for example, .\FFUDevelopment\Drivers\HP, .\FFUDevelopment\Drivers\Dell). These drivers are then injected into the FFU during the build.
When to Enable
You may want to enable Cleanup Drivers in the following scenarios:
- Conserving disk space: Driver packages can be large (several gigabytes per manufacturer), and removing them after a successful build frees up storage
- Ensuring fresh drivers: When you want each build to download the latest available drivers rather than reusing previously downloaded versions
- Single-use builds: When building an FFU for a one-time deployment and you don’t need to retain the driver files
When to Disable
You may want to keep Cleanup Drivers disabled in the following scenarios:
- Multiple builds with same drivers: If you’re running consecutive builds targeting the same hardware models, keeping drivers avoids re-downloading them each time
- Debugging driver issues: When troubleshooting driver injection problems and you want to manually inspect the downloaded driver contents
- Offline builds: When building in an environment with limited or no internet access, retaining drivers allows reuse across builds
- Bring Your Own Drivers: When you download and bring your own set of drivers from another source and don’t want FFU Builder to remove them
Note
Only the contents within the Drivers folder are removed. The folder itself is preserved. If no drivers were downloaded during the build, this option has no effect.
Remove FFU
Controls the -RemoveFFU parameter. When checked, all FFU files in the FFU Capture Location are automatically deleted after the build completes successfully. The default is unchecked.
During the build process, the captured FFU image is written to the FFU Capture Location (for example, .\FFUDevelopment\FFU). This option removes all .ffu files from that folder after the build finishes, including any previously captured FFU files that may exist in the folder.
When to Enable
You may want to enable Remove FFU in the following scenarios:
- USB-only workflow: When you’re using Build USB Drive to copy the FFU directly to a USB drive and don’t need to retain the FFU file on the host machine
- Conserving disk space: FFU files can be very large depending on what you’re installing, and removing them after copying to USB frees up storage
- Automated build pipelines: When running automated builds where the FFU is immediately transferred to another location (such as a network share or deployment server) and no longer needed locally
When to Disable
You may want to keep Remove FFU disabled in the following scenarios:
- Archival purposes: When you want to retain captured FFU images for future deployments or as a backup
- Multiple USB drives: When you need to create additional USB deployment drives at a later time
- Testing and validation: When you want to test the FFU in Hyper-V or other environments before deploying to physical hardware
Warning
This option removes all FFU files in the FFU Capture Location folder, not just the FFU from the current build. If you have previously captured FFU files stored in this folder that you want to keep, do not enable this option or move those files to a different location before building.
Remove Apps Folder Content
Controls the -RemoveApps parameter. When checked, application content in the Apps folder is automatically deleted after the FFU has been successfully captured. The default is unchecked.
During the build process, application content accumulates in several subfolders within the Apps folder (for example, .\FFUDevelopment\Apps):
| Folder | Contents |
|---|---|
Win32 | Winget source applications and Bring Your Own Apps content copied using theCopy Apps button or manually copied |
MSStore | Microsoft Store applications downloaded via Winget |
Office | Microsoft 365 Apps installer files downloaded by the Office Deployment Tool |
Additionally, the WinGetWin32Apps.json orchestration file in .\FFUDevelopment\Apps\Orchestration is removed. This file is automatically regenerated at build time based on downloaded applications.
When this option is enabled, the cleanup process removes:
- The entire
Win32folder and its contents - The entire
MSStorefolder and its contents - The Office download subfolder (
Office\Office) and thesetup.exefile within theOfficefolder
When to Enable
You may want to keep Remove Apps Folder Content enabled in the following scenarios:
- Conserving disk space: Downloaded application installers can consume significant storage, and removing them after a successful build frees up space
- Ensuring fresh downloads: When you want each build to download the latest available application versions rather than reusing previously downloaded content
- Single-use builds: When building an FFU for a one-time deployment and you don’t need to retain the application files
When to Disable
You may want to disable Remove Apps Folder Content in the following scenarios:
- Multiple builds with same apps: If you’re running consecutive builds with identical application configurations, keeping the downloaded content avoids re-downloading applications each time
- Debugging app installations: When troubleshooting application installation issues and you want to manually inspect the downloaded content
- Offline builds: When building in an environment with limited or no internet access, retaining downloaded applications allows reuse across builds
- Preserving Bring Your Own Apps: When you’ve manually copied application content into the
Win32folder and don’t want FFU Builder to remove it
Note
Only the application content subfolders are removed. The
Appsfolder itself and configuration files such asAppList.jsonandUserAppList.jsonare preserved. If no applications were configured for the build, this option has no effect.
Remove Downloaded Update Files
Controls the -RemoveUpdates parameter. When checked, downloaded Windows updates and application update payloads are automatically deleted after the FFU has been successfully captured. The default is unchecked.
During the build process, update files are downloaded to specific locations within the FFUDevelopment folder:
| Folder | Contents |
|---|---|
KB | Windows Cumulative Updates (CU) and .NET Framework updates |
Apps\Defender | Microsoft Defender definition updates |
Apps\Edge | Microsoft Edge browser installer |
Apps\MSRT | Malicious Software Removal Tool updates |
Apps\OneDrive | Microsoft OneDrive installer |
When this option is enabled, the cleanup process removes the entire KB folder and the specific update subfolders within the Apps directory.
When to Enable
You may want to keep Remove Downloaded Update Files enabled in the following scenarios:
- Conserving disk space: Windows Cumulative Updates can be several gigabytes in size, and removing them after a successful build frees up significant storage
- Ensuring latest updates: When you want each build to download the absolute latest available updates rather than potentially reusing older cached versions
When to Disable
You may want to disable Remove Downloaded Update Files in the following scenarios:
- Multiple builds: If you’re running consecutive builds, keeping the downloaded updates avoids re-downloading large Cumulative Update files each time
- Offline builds: When building in an environment with limited or no internet access, retaining downloaded updates allows reuse across builds
- Testing and validation: When you want to manually inspect the update files that were included in the build
Note
Only the update-specific subfolders are removed. The
Appsfolder itself and other application content, unless Remove Apps Folder Content is also selected, are preserved.
Remove Downloaded ESD file(s)
Controls the -RemoveDownloadedESD parameter. When checked, downloaded Windows ESD files are automatically deleted after they have been applied. The default is checked.
This setting applies to builds that use downloaded Windows ESD media instead of a provided ISO. When enabled, the build removes the downloaded .esd file after it has been used. When disabled, the downloaded .esd is kept for reuse on later builds.
When to Enable
You may want to keep Remove Downloaded ESD file(s) enabled in the following scenarios:
- Conserving disk space: Downloaded ESD files can be large, and removing them after a successful build frees up storage
- Ensuring fresh media: When you want each build to download the latest available ESD for the selected release and version
- Single-use builds: When you do not expect to reuse the same downloaded source media again
When to Disable
You may want to disable Remove Downloaded ESD file(s) in the following scenarios:
- Multiple builds with the same source media: Keeping the ESD avoids re-downloading it each time
- Offline or bandwidth-constrained environments: Retaining the ESD allows reuse across builds
- Troubleshooting source-media issues: When you want to preserve the downloaded ESD for inspection or repeat testing
Note
This option only applies when the build used a downloaded
.esdfile. If you provide a Windows ISO instead, this setting has no effect.
Build Page Actions
These buttons sit below the Build tab expanders and operate on the overall page state rather than a single expander.
Restore Defaults
Use this to restore FFU Builder to its default state. When clicked:
- A confirmation dialog lists what will be removed before anything is deleted.
- Generated JSON files are removed (
config\FFUConfig.json,Apps\AppList.json,Apps\UserAppList.json,Drivers\Drivers.json). - Capture, Deploy, and Apps ISO files are deleted.
- Downloaded artifacts are cleared: Apps payloads (Win32, MSStore, Office downloads), update folders under Apps (Defender, Edge, MSRT, OneDrive), driver downloads, and all
.ffufiles in the FFU capture folder. - UI list views (drivers, apps, Winget search results, AppScript variables) are cleared and all controls are reset to their default values.
- Generated JSON files are removed (
Note
VHDX cache and any custom config files in the
FFUDevelopment\configfolder, andDrivers\DriverMapping.jsonwill remain. DriverMapping.json is retained because you may have made custom changes to it and we want to retain those.If you want to keep any content prior to restoring defaults, copy it out first.
Save Config File
Saves all current UI selections to a JSON file so you can reload the same settings later or run BuildFFUVM.ps1 from the command line with -configFile (e.g. BuildFFUVM.ps1 -configFile C:\FFUDevelopment\config\FFUConfig.json)
How it works
- Collects the full UI state (paths, toggles, driver/app selections, build options) into a single JSON.
- Defaults the save location to
FFUDevelopmentPath\configand suggestsFFUConfig.jsonas the file name. You can browse and pick a different file name or folder. - Creates the
configfolder if it does not exist and confirms the save when finished.
Load Config File
Loads a previously saved configuration JSON and repopulates the UI.
How it works
- Click Load Config File to browse for a JSON file (for example,
FFUDevelopment\config\FFUConfig.json). - The UI updates with everything from the file: paths, checkboxes, build options, driver/app selections, and USB settings.
- Supplemental files referenced in the config (Winget
AppList.json, BYOUserAppList.json,Drivers.json) are also imported if they exist. Missing helper files are treated as optional and noted for you. - If the file is empty, unreadable, or invalid JSON, the load is stopped and an error message is shown.
Build FFU
Use Build FFU to run BuildFFUVM.ps1 with the current UI selections.
What happens when you click Build FFU
- The UI gathers all current settings and saves them to
FFUDevelopment\config\FFUConfig.json, and launchesBuildFFUVM.ps1 -configFilepointing to that file in a background job.FFUConfig.jsonpersists between builds and is read on each opening ofBuildFFUVM_UI.ps1so you can continue where you left off on each new run. - The window switches to the Monitor tab so you can watch progress in real time.
- The progress bar shows overall completion
- When the job finishes, the button returns to Build FFU and the UI is ready for the next run.
Cancelling a Build
The Build FFU button will change to Cancel while a build is running. Cancelling will do the following:
- The UI stops the background build job and kills any child processes so DISM, downloads, and other tools exit.
- The in-progress download is always removed to avoid partial or corrupt content.
- You’re prompted to decide whether to remove other items downloaded during this run. Selecting Yes removes only this run’s downloads. Any previously downloaded content stays in place.
- When cleanup is finished, the Cancel button reverts to Build FFU and a new build can begin